Now that you have decided to create an awesome website using Power Pages (congratulations on the great decision), you need to know how to keep it safe, and how to assign permissions and roles to the different users of your website, and the best way to do so is by using web roles.
What are Web Roles?
A Web role in Microsoft Power Pages is like a backpack that contains different permissions to different things in the website, to make it easier for you to manage permissions, without having to manually assign permissions to users for every single page and part of the website.
Web roles are also important to assign to your users, especially the authenticated ones, before giving them access to things like restricted tables and restricted pages.
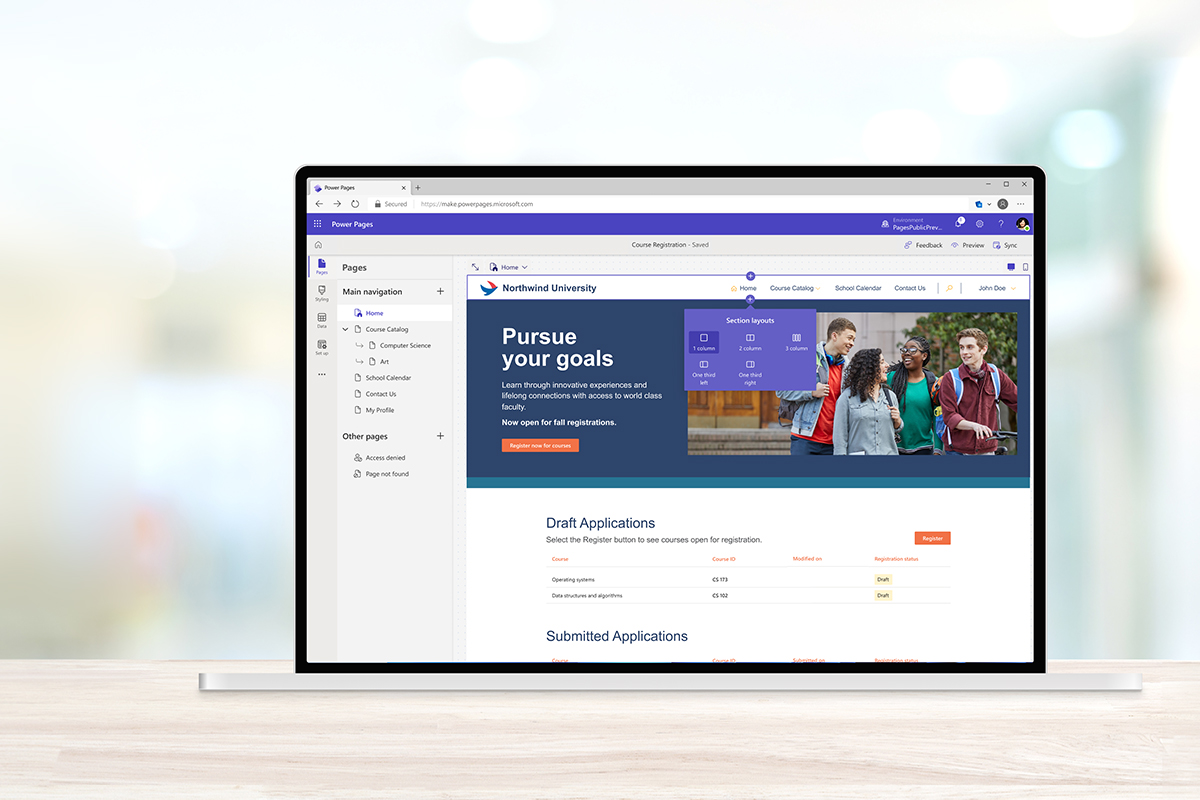
You can find the web roles interface in the Portal management app for your Power Pages website, under the security section, as seen in the picture below:

Types of Web Roles
Currently, Power Pages provide us with 3 default web roles that can be set to any authenticated user. These roles are:
- Administrator: Full access to all features and settings. Can pretty much do anything in the website.
- Editor: Can create and edit content in various ways with some administrative access, but that access is very limited.
- Viewer: This is the role that most users will have. A view can only view content, with no permissions to edit or adjust settings.
If these web roles aren’t the ones you are looking for, and would like to create custom roles, then that is possible as well.
Create Custom Web Roles
Custom roles in Power Pages provide the flexibility to specify access and permissions to fit the custom needs of your website. Unlike default roles, which come predefined with a set of permissions, custom roles allow you to specify exactly what actions a user can or cannot perform.
Creating Custom Roles
To create a custom role, simply visit the Web Roles section in your portal management app (as seen in the previous picture), then press the new button on the left side of the menu above:

Here you can provide all the information needed for the creation of the web role. Make sure to also define whether this custom web role will be used for authenticated users or anonymous users.
Once you have provided the information, click on the save & close button. Then navigate back to the web roles UI, click on your new webrole, and now you will see a button called “Related”, inside of which you will find all the other settings to define what permissions and access this web role will provide its users:

Best Practices for Web Roles
Now that you know more about web roles, here are some best practices and things to keep in mind when working with them, to make sure that your website remains secure, user-friendly, and well-managed.
- Least Privilege Access: This is a big one when it comes to the security of any system. Always assign the least amount of access needed for a user to perform their role. This helps in minimizing potential security risks, and helps minimize confusion for the users.
- Regular Reviews: Every month or so, review the roles and permissions to ensure they still align with the users’ needs and the website’s objectives. This is particularly important as your website evolves over time and when you keep adding new users.
- Clear Definitions: Make sure the responsibilities and permissions of each role are clearly defined and documented. This helps in avoiding confusion and ensures everyone understands their capabilities within the website.
- User Training: Educate your users about the importance of their roles and the proper use of the website. This can help prevent accidental misuse or security breaches.
- Use Custom Roles Wisely: While custom roles offer flexibility, creating too many can make management complicated. Aim to keep your roles as simple and as few as necessary, especially the custom ones.
- Secure Authentication: Ensure that the process for users to log in and authenticate is secure. This might involve implementing multi-factor authentication or regular password updates. For more on how to secure your Power Pages website, check out this article.
- Monitor and Audit: Regularly monitor and audit actions taken by users with different web roles. This can help you quickly identify and address any inappropriate use or security issues.
Conclusion
Web roles are a fundamental feature in Power Pages that help you manage access and functionality across your website. By understanding and applying web roles effectively, you can ensure that your website is secure, efficient, and customized to provide a positive experience for all users.
Remember, the key to success with web roles lies in careful planning, regular review, and adherence to best practices. Whether you’re managing a small community website or a large corporate portal, web roles empower you to maintain control over who can see and do what, making your website a safer and more organized space for everyone involved.